The Basics of Using Dreamweaver- Images & LinksAuthor: Mark
Reynolds Inserting ImagesOK now we have set the basic page up we are able to add what content
we want to it. Like images! The first thing we need to do is to
create a folder beneath your site root folder called images. Create
an image and save it to this folder. Now what you need to do is
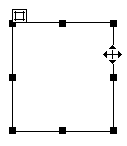
to click the "Insert Image" button Browse to your images folder and select the image you want. Your image will then be inserted into the page that you have created. Clever eh? But wait a minute - Is that really where you want the image? If the answer is no then here you will find the magic of Dreamweaver's Layers feature invaluable! Now when you click the layers button You may also put the image dimensions into the Properties Inspector. To select the layer, move your cursor over the layer until it turns into a cross, then click the layer. You should get the layer selected with a white square in the top left hand corner like this one:
How to Link Pages TogetherHere we are going to learn how to link two pages together within your site. Just remember that whatever you do, make sure that the file you are linking to is beneath your root folder! OK, what we first need to do is to create a new page. From the menu, select File» New. Set the page title as we did before along with the background color, text color and the link colors as before. Now save this file, File» Save As "page2.htm". Go back to the first page that we created and type this text in "Please link and make it work" in the bottom left hand corner. Or if you prefer use a layer to hold the text. Oh sorry did I not say? You can use layers for text as well! Now select the text (by clicking and dragging) to highlight the text you wish to become a link. Next click the little yellow folder next to the link box on the Properties Inspector.
and browse to the file that you created earlier. Select that file and click OK. You have just linked two pages together! Now was that not easy? Now that we've covered the basics, go practice until your pages are an absolute masterpiece! |
||||
« Previous | 1 | 2 | 3 | 4 |
::This page last modified 8/13/2013 at 04:37::
 |
Copyright
© 2001-2026 DreamweaverFAQ.com All Rights Reserved. All brands, trademarks, tutorials, extensions, code, and articles are the property of their respective owners. A production of Site Drive Inc. Legal Notice | Privacy Policy | Disclaimer & Notice
|
 |